The “minidrone” market is incredibly saturated these days. From micro-quads that fit in the palm of your hand, up to those that just about squeeze in your jeans pocket (I’m looking at you DJI Spark), there’s a “minidrone” to fit any size requirement at any budget. Enter the Parrot Mambo Mission, a minidrone with stand-out features amongst a buzz of generic quads.
Table of Contents
Features
- Detachable cannon and grabber
- Take off/Landing function
- Up to 6m/s maximum speed
- Up to 10 minutes of flight time (no accessories)
- Up to 100m flight range when using a Parrot Flypad, or 24m via Bluetooth
- Downward facing ultrasound sensor for accurate hovering below 4m (13ft)
- 660mAh removable LiPo battery
- 30 minute full charge time when using a 2.1A charger
- 3-axis accelerometer and 3-axis gyroscope
- 7.1″ x 7.1″ (18cm x 18 cm) with bumpers attached
- Lightweight, at only 63g (2.2oz) without bumpers or accessories attached
- The drone is running on a Linux OS and has an available SDK
Design and build quality
The Mambo has a fairly simplistic design, with Parrot opting for a simple black and white colouring system. The Mambo constructed wholly out of plastic and the only metal in sight is that of the motors.
Straight out of the box, you notice how lightweight this quad is. Without the bumpers or any accessories installed, the Mambo weighs in at only 63 grams… to put that in perspective, that’s only 5 grams heavier than a standard, regulation tennis ball!
Attention is quickly drawn to the slightly strange, Lego shaped connector on the top side of the drone. Once you remove the grabber and cannon from the box, you’ll realise that this is the mounting mechanism for the cannon accessory, whilst the grabber simply clips on to the front two arms of the drone and has a wired adaptor for the Lego-style connector.
On the rear of the Mambo, you’ll find an opening into which you slide the included 660mAh LiPo battery. The battery simply clips into place via the black plastic tab on the back. On the front of the device, there are two green LED’s
FreeFlight Mini app
To get the Mambo up and running, you’ll need to download and install the FreeFlight Mini app onto your device of choice. The app comes in both iOS and Android flavours. Once downloaded, you simply open the app to start up the Bluetooth pairing process with your minidrone (all of which is done within the app by the way – no app switching required!) and you’re almost ready to go. It’s time to upgrade your drones firmware to the latest version – which I’d highly recommend you do straight off the bat. If you opt to upgrade the firmware via Bluetooth, prepare to find something else to do for the next half an hour or so, as this process can take a while!
You can upgrade the drone’s firmware via USB, however if you opt to upgrade via Bluetooth, you can at least have your drone charging at full speed at the same time. Not only that, but it also give you time to read through the manual and find some reviews/guides online, ready for your first flight! 🙂
The FreeFlight Mini app is incredibly easy to use. Navigation is clear and simple and you can start flying straight away without needing to tweak anything! There is, however, the option to jump into a few more complex settings menu’s to tweak various flight variables, such as ascent speeds, flight modes, customizing FlyPad layouts etc. and you can easily access key metrics from your drone, such as remaining battery and flight time.
Setup and flight
As mentioned above, setting up the Mambo via the FreeFlight Mini app is a fairly straightforward affair. Once your smartphone is connected via Bluetooth, you’re good to go.

You have three standard methods/layouts that can be used to control your drone. You can select the standard “joystick” mode, you have the “device orientation” mode (aka “Normal”) – in which the drone replicates your smartphones movements (tilt forwards to go forwards, back to go back) – and finally you have what could be considered the “expert” mode (aka “Ace”), where you can perform sharper manoeuvres and acrobatics than in the other two modes.
To take off, you have two options: 1) place the drone on a flat surface and then tap the “Take-Off” button on screen, or 2) power up the drone, lay it flat in your hand and then throw it up in the air. Personally, I found the throw it up in the air option significantly more appealing and found myself basically frisbee-ing the drone for take-off’s.
Once in the air though, the Mambo Mission is a surprisingly stable flyer! I was shocked as to how little the drone drifted/moved, all thanks to that downward facing camera (in a decently lit room), ultrasound sensor and the 3-axis gyro/3-axis accelerometer setup. The app gives you the ability to perform various stunts and thanks to the open SDK for this drone, I’m sure you could program it to do some incredible things!
That being said, this thing is incredibly loud for something so compact. There’s no spinning it up and flying around with no one noticing. The volume I could put up with, but the pitch that it outputs – imagine a large bumble bee sitting next to one ear whilst a fruit fly sits next to the other… it’s just plain annoying! My cats hate the sound, my dogs hate the sound and my wife absolutely hates the sound.
Taking this outside, I was very conscious of its size. It did a fair job dealing with light breezes and remained fairly stable and in place whilst fighting the breeze, but as soon as a small gust of wind came along that was it. I didn’t fly high or far simply due to the fact I was worried that the drone would either take off with the wind or would come crashing down to the floor and end up being a pile of shattered plastic. To put it plainly: I have no faith in the outdoor flying ability of this drone. If you live in a completely wind-free area, you’ll likely be perfectly fine. I live in England where if it’s not raining, it’s windy… so from that point onwards I stuck to indoor flying.
Grabber and cannon
The grabber and the cannon are the two stand out features of the Mambo Mission. Attached via the aforementioned “Lego” style connector, you can either mount a small cannon that fires 6mm BB pellets to the top of the drone, or a small grabber arm to the front two arms of the drone.
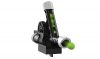
In my opinion, the mini cannon is the most fun accessory to use simply because it’s easier to use! Pressing “Fire” on your phone’s screen can result in a small 6mm plastic ball being fired once every 1.5 seconds. The cannon can hold up to 6 pellets, so you get a good 9 seconds of shooting time. From shooting down a cup pyramid, to chasing my wife around the house and on to hunting down other minidrones, the cannon results in plenty of fun and attempts at advanced trick shots.
Unfortunately, the pellets are the easiest thing to lose. Whilst the cannon only has a shot range of around 2m (6ft), it’s surprising how easy it is to lose track of where the ball went after being fired. Fortunately though, Parrot provide 50 pellets for you to use… but be prepared to buy some more.
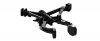
Moving on to the grabber, whilst this accessory is still fun to use I found it nowhere near as fun as flying around shooting things. The grabber is quite short/compact and doesn’t have much reach out in front of the propellers, so trying to accurately hover whilst trying to grab something (that weighs less than 4g, as that’s about as much as the drone can handle) is an incredibly complex task! My first attempt at grabbing something was the classic “straw in a cup”. However, as soon as I got anywhere near, the straw would blow all over the place or get caught in the props.
The best thing to do with the grabber is to actually grab a hold of something before taking off and then going on a “bomb run”. I found the drone was able to happily carry a dog treat, so I’d load one up and fly around my house until I found one of my dogs – at which point it was “bombs away!!!!!“. This lead to more advanced bomb runs, such as trying to fly over a target and dropping an item onto said target, or flying over my wife whilst she’s sat on her phone and dropping things on her. 😀
Flight time/battery life
Parrot claim a maximum flight time of 10 minutes without any accessories attached (that figure drops to around 8 minutes with one accessory being used). In reality, I found flight time to fall anywhere between 5 minutes (accessory in use) and 7 minutes (accessory not in use) which is a fair bit lower than the claimed flight time. Thankfully though, the battery is removable/replaceable, which means you can order spare batteries and as your battery level starts to get low you can swap out and carry on!
If you opt to stick with the included battery only, you’re looking at around 30 minutes of down-time between flights whilst your drone charges up. Make sure you use a 2.1A wall plug though for maximum charging speeds. As the Mambo is USB rechargeable, you could quite easily top this up via a portable power bank for on-the-go flying.
You can quite easily find spare/replacement batteries online (Amazon) that offer larger battery capacity (700mAh vs 660mAh), multi-pack batteries and multi-battery chargers. The most common multi-battery charger is a 4-way charger and if you fork out for 4 x 700mAh batteries, you could quite easily get between 40 and 50 minutes of semi-continuous flight time!
Smartphone vs FlyPad
Pairing your Mambo Mission with your smartphone is the standard and ultimately, less expensive method of getting up and running. You pair your drone via Bluetooth and off you go – you get a flight range of up to 40m (line of sight) and you have all of your controls in a single place.
Controlling the drone, however, can be a little more fiddly on a smartphone screen. Lifting your thumb from the screen requires you to look back down (rather than at your drone) to get your finger placement right again and actions can be slightly delayed at further operating distances.

The FlyPad is your standard handheld remote controller, with standard joysticks and a mounting solution for your smartphone. If you purchase the drone without this, it will set you back an extra £39/$39. It does mean you can control your drone, whilst also use your smartphone for in-flight data or FPV if your drone/accessory supports it.
There are some benefits to the FlyPad though – controls/actions feel significantly more responsive, flight range is extended to 100m thanks to a direct/dedicated Bluetooth connection with your drone, the controller feels significantly more natural in-hand, it’s compatible with multiple models of Parrot’s minidrones and is separately chargeable with a 6 hour battery life on it’s own.
Issues I had
On my first flight, the Mambo felt extremely unresponsive to my input via both the FlyPad and my iPhone. My input on either device would only be performed on the drone around half a second later, which when flying at high speed is half a second too late! It was at this point that I found out there was a firmware update for the drone available, which appeared to resolve the issue.
Talking about firmware updates…. updating the firmware via Bluetooth was by far the most unstable thing to do the first time around. Three failures later I decided to update the firmware via USB which was a relatively straight forward process (make sure you follow the set of instructions when doing so) and resulted in a much quicker upgrade. After doing this upgrade, later Bluetooth upgrades seemed slightly more stable.
The Lego brick connector required quite a bit of force in order to mount the accessory. The most fiddly to mount was the grabber, as it has a wire that needs routing through the drone to the top-side where the connector sits. I ended up going with a bit of a “ghetto solution”, by using some bluetac around the outer area of each brick and using that to keep the brick in place. Later on, after lots of Googling, I found that simply applying more force when mounting did the job and the “bricks” would click and stay firmly place.
The battery release tab was incredibly in-flexible and it was near impossible to swap out the batteries without worrying about breaking the clip. As this appears to be the main retention system, breaking the clip would result in the battery not staying in place…. I can’t help but thing there’s a better solution here!
Summary
TL;DR – This drone is incredibly compact, pretty capable indoors but it’s not without its flaws. It’s pretty damn expensive for what you get as a minimum and you’ll find yourself wanting to fork out an extra £30 for batteries, spare props, extra BB pellets etc. which puts the total package price at well over £150!
Outdoor flying for me was a no-go. Really light breezes and the Mambo would be just about flyable but anything more than a light breeze and that’s it. This also means that the extended range from the FlyPad is essentially useless to me (I don’t know about you, but I don’t have anywhere in my house that is over 60m long whilst retaining line of sight!). That being said, the overall responsiveness and ease of flight from using the FlyPad is a significant improvement compared to trying to operate the drone via my smartphone.
The Mambo is pretty fast, has some impressive acrobatic abilities, can scale up control-ability as your experience and flight ability improves over time, and the included grabber/cannon is a great standout feature, resulting in some fun challenges and experiences. The Mambo is the only drone I’ve seen with a “cannon” so it’s definitely unique.
If you’re slowly building up your drone flying experience, the Mambo is a great stepping-stone. But in my opinion, it’s just that… a stepping-stone. If you want a drone that does acrobatics and whizzes about your house, I’d recommend looking at something small and cheap like the Cheerson CX-10. I’ve had hours and hours (if not days and days) of fun with that tiny little thing and the lack of extra stabilization has resulted in me learning to fine-tune my flying ability significantly more than I’d ever expect to learn with the Mambo. Not only that, but the Cheerson CX-10 will only set you back around £20/$20 so is slightly more “expendable”.
I’d recommend this drone if you were considering purchasing one second hand (in good condition obviously) from somewhere like eBay. You can get this minidrone much cheaper than RRP and at a price that makes it worthwhile buying it. If Parrot dropped the price to around £80 (in-line with similarly featured minidrones) then I’d have no problem recommending it, but at £140 RRP… 😕
Useful links
Parrot’s website: https://www.parrot.com/
Product page: https://www.parrot.com/global/minidrones/parrot-mambo-mission#parrot-mambo-mission
Amazon UK: https://www.amazon.co.uk/Parrot-Mambo-Drone-Fly-Pad/dp/B074TKNHWX/
Amazon US: https://www.amazon.com/Parrot-Mambo-Mission-Complete-Accessories/dp/B074TKNHWX/